
Using a library to do form validation can save lots of your development time. Being a tested and proven library guarantees it. jQuery Form validation library is the most popular validation library. This post collects all my notes and references on jQuery Form validation library. This includes a large bunch of sample code and a complete reference guide to all the built-in validation rules in the library.
Reference Links:
- Website: http://jqueryvalidation.org/
- GitHub : https://github.com/jzaefferer/jquery-validation
- Author’s website: http://bassistance.de/jquery-plugins/jquery-plugin-validation/
A Simple Usage Demo:
Include the jQuery validation library. You can download the latest version or use the CDN:
<!--include jQuery -->
<script src="http://ajax.googleapis.com/ajax/libs/jquery/1.11.1/jquery.min.js"
type="text/javascript"></script>

<!--include jQuery Validation Plugin-->
<script src="http://ajax.aspnetcdn.com/ajax/jquery.validate/1.12.0/jquery.validate.min.js"
type="text/javascript"></script>

<!--Optional: include only if you are using the extra rules in additional-methods.js -->
<script src="http://ajax.aspnetcdn.com/ajax/jquery.validate/1.12.0/additional-methods.min.js"
type="text/javascript"></script>
Now you can setup the validation rules for the form like this:
$("#myemailform").validate(
      {
        rules:
        {
          fullname:
          {
            required: true
          },
          email:
          {
            required: true,
            email: true
          }
        },
        messages:
        {
          fullname:
          {
            required: "Please enter your name"
          },
          email:
          {
            required: "Please enter your email address."
          }
        }
      });
myemailform is the id of the form. (where form is like this: <form id='myemailform' ...> ) the validate() function takes the rules, messages and other options for the validation.
In simple form, the format is like this: $('#formid').validate( { rules:{ }, messages:{ } } );
rules contains the form elements and the corresponding validations.
rules:
    {
        input_1:
        {
            validation_1: param_1,
            validation_2: param_2
        }
        input_2:
        {
            validation_3: param_3,
            validation_4: param_4
        }
    }
validation_1, validation_2 etc are validation rules. The reference section below has a list of all built-in validation rules that you can choose.
messages contains the customized message for the validations:
messages:
    {
        input_1:
        {
            validation_1: "message for validation_1",
            validation_2: "message for validation_2"
        }
        input_2:
        {
            validation_3: "message for validation_3",
            validation_4: "message for validation_4"
        }
    }
If you skip the message for a validation, the default message is displayed.
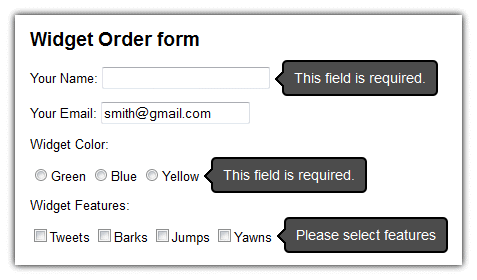
Always Customize the Error Message
The messages parameter is optional. If you skip the messages parameter, the plugin will display default, auto-generated messages. However, You should always customize the validation error messages. If you imagine form as a dialog between your website and your user, the messages play an important role. Don’t leave it to the auto-generated default messages. Explain to your user what is wrong and suggest solutions.
Common Text Input Validations
Common validations for text field are ‘required’, minlength, maxlength or matching with a text pattern for a pattern In the example code above, fullname: { required: true } declares the fullname field to be mandatory.
minlength,maxlength or rangelength
Use the minlength,maxlength or rangelength validation rules to check the length of the text field input.
$("#productform").validate(
      {
        rules:
        {
          prodid:
          {
            required: true,
            maxlength: 10
          },
          email:
          {
            required: true,
            email: true,
            minlength:10
          },
          address:
          {
            required: true,
            rangelength:[10,250]
          },
          message:
          {
            rangelength:[50,1050]
          }
        }
      });
A Note About minlength
minlength means, that “if the user attempted entering the value, then check minlength”. So if there is no input, minlength has no effect. You have to add the required validation to mean: “the input always needs to be of x characters or more”
Numeric Range: min, max, range
This is for numeric inputs - when you wan to to check whether the input falls in a certain numeric range. For example, if the input should be greater than or equal to 10 then the validation is min:10 More examples:
$("#myform").validate(
      {
        rules:
        {
          items:
          {
            required: true,
            min:1
          },
          amount:
          {
            range:[10,100]
          },
          factor:
          {
            required: true,
            range:[0.08,0.09]
          },
          dullness:
          {
            required: true,
            range:[-9.5,11.1]
          }
        }
      });
Checking the Text Pattern: Email, URL, Phone Number etc
Common text input patterns like email, URL, decimal number etc are available “ready to use” in the library. The additional-methods.js contains even more text pattern validations. additional-methods.js also contains a ‘pattern’ validation where you can give a regular expression as a parameter. Here are some common text pattern validations:
$("#myform").validate(
      {
        rules:
        {
          email:
          {
            required: true,
            email:true
          },
          url:
          {
            url:true
          },
          factor:
          {
            required: true,
            number:true
          },
          items:
          {
            required: true,
            digits:true
          }
        }
      });
Validating a Dropdown List
Doing a ‘required’ validation for a Dropdown list is a bit tricky. Dropdown list will always have one item always selected. Have an option with label like ‘Select …’ and the option value empty. Then add the rest of the options. Then you can apply the ‘required’ validation to the Dropdown list. If the default option (‘Select …’) has a non-empty value, the required validation won’t give the desired result.
<select name='item'  size='1'>
     <option value=''>Select ...</option>
      <option value='Avocado'>Avocado</option>
      <option value='Bell Pepper'>Bell Pepper</option>
...
</select>
Notice the value='' for the first option. Now the validation code:
$("#myform").validate(
      {
        rules:
        {
          item:
          {
            required: true
          }
        }
      });
Validating Radio Groups
You can apply the ‘required’ validation to the radio group. However, radio group will need some custom handling to place the error message properly. By default, the error message is displayed next to the first radio button in the group. The code below shows how to custom place the error message. The HTML code of the radio group first:
<p class='container'>
    <label><input type='radio' name='Color' value='Red' />Red</label>
    <label><input type='radio' name='Color' value='Green' />Green</label>
    <label><input type='radio' name='Color' value='Blue' />Blue</label>
</p>
The Validation Code:
$('#myform').validate(
{
    rules:
    {
      Color:{ required:true }
    },
    messages:
    {
      Color:
      {
        required:"Please select a Color"
      }
    },
    errorPlacement: function(error, element)
    {
        if ( element.is(":radio") )
        {
            error.appendTo( element.parents('.container') );
        }
        else
        { // This is the default behavior
            error.insertAfter( element );
        }
    }
});
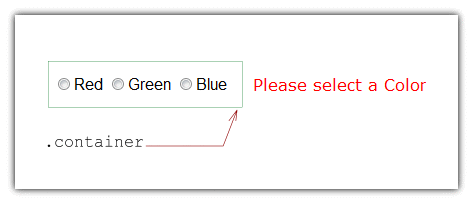 See the errorPlacement() handler. If the error is for a radio button, we search for a parent element with class ‘container’ and attach the error message there. See the Demo @CodePen
Validating a Group of Checkboxes
A check box group allows the user to select multiple options. A common validation for such an input would be to limit the options that can be selected (minimum /maximum to be selected). You can use the minlength/maxlength/rangelength validations for check box group as well.
<p class='container'>
    <label><input type='checkbox' name='Colors[]' value='Red' />Red</label>
    <label><input type='checkbox' name='Colors[]' value='Green' />Green</label>
    <label><input type='checkbox' name='Colors[]' value='Blue' />Blue</label>
    <label><input type='checkbox' name='Colors[]' value='Yellow' />Yellow</label>
    <label><input type='checkbox' name='Colors[]' value='White' />White</label>
</p>
$('#myform').validate(
{
    rules:
    {
        'Colors[]':{ required:true, minlength:2 }
    },
    messages:
    {
        'Colors[]':
        {
            minlength:"Please select at least {0} options"
        }
    },
    errorPlacement: function(error, element)
    {
        if ( element.is(":checkbox") )
        {
            error.appendTo( element.parents('.container') );
        }
        else
        { // This is the default behavior
            error.insertAfter( element );
        }
    }
});
Just like the radio group, checkbox group also requires some custom error placement to make it look good.
Note About minlength
The note on minlength for textbox applies to checkbox group too. If there is no input, minlength has no effect. So, add the required validation along with the minlength validation.
Skipping Validations for Certain Elements
It may be required in certain cases you want to ignore the validations of an element. This can become especially handy in case of dynamically generated forms. You can use the ‘ignore’ option in this case. the parameter to the ignore parameter is jQuery selector that is similar to any jQuery .not() selector.
Example:
$(function()
{
    var validator = $('#myform').validate(
    {
        ignore:'.skip',
        rules:
        {
          'email':{ required:true, email:true }
        }
    });

    $('#chksubscribe').change(function()
    {
      if($(this).is(":checked"))
      {
        $('#email').removeClass('skip');
      }
      else
      {
        $('#email').addClass('skip');
      }
      validator.resetForm();
    });

});
In this example, if the subscribe option is selected, the email field should be validated.
Note that the selector to the ignore parameter is the .skip class. We handle the checkbox change event and add a .skip class when the check box is not selected.
If there are more than one selectors, you can separate them with comma. Example: ignore:".skip,.ignore,.other_ignore,:hidden"
Conditional Validations
In certain cases, you may want to apply validations only on certain conditions. For example, a set of radio buttons and an ‘other’ option with a text input.
The ‘depends’ parameter takes a function that returns true or false. The function should return true if the validation is enabled.
rules:
{
  channel:
  {
    required:true
  },
  other:
  {
    required:
    {
        depends:function()
        {
          var sel =
            $('input[name=channel]:checked', '#myform').val();

          if(sel =='other')
            {
                return true;
            }
          else
            {
                return false;
            }
        }
    }
  }
}
The channel (radio group) is a required input. The ‘other’ text input depends on the radio group selection. The depends function checks the option selected for ‘channel’ and returns true or false depending on the selection.
You can pass a jQuery selector string to the ‘depends’ parameter as well. In this case, if one or more items are selected by the jQuery selector, the validation is enabled. Example:
email:
{
    required:
    {
        depends:"input[name='subscriptions[]']:checked"
    }
}
Ajax Validation - Checking the Uniqueness of email or username
There are certain validations that can’t be done locally. Those validations that require checking with the server database. Examples are checking whether the email address is already signed up or checking the uniqueness of a user name.
jQuery Form Validation plugin has a ‘remote’ validation that you can use to send the input to a remote script and get it validated. Here is the code that sets up the validation:
$("#myemailform").validate(
{
    rules:
    {
        email:
        {
            required: true,
            email: true,
            remote:'check-email.php'
        }
    },
    messages:
    {
        email:
        {
            required: "Please enter your email address.",
            remote:"This email was already used for signing up."
        }
    }
});
The parameter to the remote validation is the URL of the script that does the validation. For this example, we have a PHP script that checks the email in the database:
<?php
    $email = $_GET["email"];

    if(!mysql_connect($dbserver,$dbuser, $dbpasswd))
    {
        echo "error: ".mysql_error();
        exit;
    }
    if(!mysql_select_db($dbname))
    {
        echo "error: ".mysql_error();
        exit;
    }

    $email = mysql_real_escape_string( $email );

    $result = mysql_query("SELECT email FROM $tablename WHERE email = '$email'");

    if(!$result)
    {
        echo "error: ".mysql_error();
        exit;
    }

    if(mysql_num_rows($result) == 0)
    {
        echo 'true';//email is unique. not signed up before
    }
    else
    {
        echo 'false';
    }
?>
The PHP script gets the email passed through the URL, checks it in the database and returns true or false. If it returns true, that means the validation is success.
Download the sample remote validation code
Adding Your Own Validation Rules
The jQuery Form validation library comes with a large set of built-in validations. However, you may want to add your own convenient validations. Often, that validation rule may need to be shared or re-used. You can add your own validation rules to the library. Use the addMethod() function. Example:
$(function()
{
    function validateDonotSelect(value,element,param)
    {
        if(value == param)
        {
          return false;
        }
        else
        {
            return true;
        }
    }
    jQuery.validator.addMethod("do_not_select",validateDonotSelect,"Please select an option");

    $('#myform').validate(
      {
      rules:
        {
          color:
          {
            do_not_select:'sel'
          }
        },
        messages:
        {
          color:
          {
            do_not_select:"Please select a Color"
          }
        }
      });
});
We are adding a ‘do_not_select’ validation. This validation would be handy if you do not want the user to leave an option selected at the default (for example, for Dropdown lists). First, we define the validation function. The validation function takes three parameters - the current value of the element, the element object itself and the parameter we pass to the validation rule. For this validation ,we can just check the value to see whether the user has selected what should not be left selected.
Then, we add the function as a validation rule to the library. Call the addMethod() function passing the new validation rule name, the function that handles it, and the default error message.
Now onwards, we can use the new validation rule just like any other validation.
Let us also add a text-pattern based custom validation. This time, we will add a German postal code validation. German postal code has 5 digits, 0 to 9. For example: 97018
jQuery.validator.addMethod("postalDE",function(value,element,param)
{
  if(this.optional(element))
    {//This is not a 'required' element and the input is empty
      return true;
    }

  if(/^[0-9]{5}$/.test(value))
    {
      return true;
    }

    return false;

},"Please enter a valid German Postal code");

$(function()
{
    $('#myform').validate(
      {
      rules:
        {
          postal:{ required:true, postalDE:true }
        }
      });

});
This time we defined the function along with the addMethod (rather than defining the function and then calling addMethod(), like in the previous example).
There is one thing that can happen when you check the input value against a regular expression. The field could be optional and the user might have skipped the input. However, our regular expression check will fail and it will still throw the error. To avoid this, we first do an optional() check. We don’t have to validate if this element is optional and empty.
Display Error Messages Using ToolTips
Tooltips have the advantage that it floats on top of the element and grabs the user’s attention. You can customize the way the errors are displayed in the jQuery Validation Plugin. In the following example, we use the Tooltipster plugin to display the error message.
See the demo @CodePen In the first part of the code, we attach the tooltip to the form elements. Tooltips, by default has a certain behavior. It opens when the user moves the mouse over an element and hides when the mouse is moved away. Fortunately, the tooltipster plugin has options to override the default behavior. We set the trigger to custom and set auto hide false. (This solution is adapted from this stackoverflow answer by sparky )
//Initialize the tooltips
$('#signupform :input').each(function()
{
  var tipelement = this;

  $(tipelement).tooltipster({
     trigger: 'custom',
     onlyOne: false,
     position: 'right',
     multiple:false,
     autoClose:false});

});
Then in the validation plugin, we handle the errorPlacement() call back and set the error text in the tooltip.
errorPlacement: function(error, element)
        {
          var $element = $(element),
              tipelement=element,
              errtxt=$(error).text(),
              last_error='';

            last_error = $(tipelement).data('last_error');
            $(tipelement).data('last_error',errtxt);
            if(errtxt !=='' && errtxt != last_error)
              {
                $(tipelement).tooltipster('content', errtxt);
                $(tipelement).tooltipster('show');
              }
        }
There is one special handling needed for group type elements like radio group or checkbox group. We need to position the error message just outside the group’s boundary. So in this example, a container div is placed. The tooltip is attached to the container. When there is a validation error in the group element the error message is placed neatly next to the group. See the demo @CodePen
Validations for Dynamically Generated Elements
You can use the validation plugin with complex dynamic forms as well. It is quite easy to add validations to dynamically generated elements in run time. To add validation rules to dynamically generated elements, use the rules() function on the element. For example:
$('.itemqty',$trcopy).rules('add',
     {
        required:true,
        min:1,
        max:5,
        messages:
        {
          required:"Please enter quantity",
          min:"minimum quantity {0}",
          max:"max quantity {0}"
        }
      });
The ‘.itmqty’ selector selects the text element. and the rules() function adds new validation rules to the element.
A Few Things to Note While Adding Validations Dynamically:
- The
validate()function should already be called before callingrules()function. Callingvalidate()initializes the validation setup for the form. In the example, the validate() function is called in the initialization stage.rules()is called when the user presses the ‘add’ link to create duplicate rows. - The dynamically created input element should be added to the DOM (inside the form) before calling
rules()function. The rules function tries to obtain the parent form of the element. If the dynamically generated input element is not inserted yet to the form, the parent form will be null andrules()function will return - Each dynamically added input element should have a unique name. The validations are consolidated based on the name.
Adding and Removing Rules Dynamically
Some forms would require re-purposing the form elements based on user selections. One way to handle this is to dynamically add or remove validation rules.
$('[name=subscription]').change(function()
  {
    var $msginput = $('[name=messages]');

    switch($(this).val())
    {
      case 'free':
        $msginput.rules('add',{max:10});
        $('#maxmsg').text("Message max limit is updated to 10");
        break;
      case 'pro':
        $msginput.rules('add',{max:50});
        $('#maxmsg').text("Message max limit is updated to 50");
        break;
      case 'dev':
        $msginput.rules('add',{max:100});
        $('#maxmsg').text("Message max limit is updated to 100");
        break;
      case 'ent':
        $msginput.rules('remove',"max");
        $('#maxmsg').text("There is no Max limit !");
        break;
    }
  })
In this example, we look for change of selection in a radio group. Then, depending on the selection, we change the 'max' validation of a textfield.
Validation Rules Ready Reference
required:
Make the field mandatory. This can be used with textboxes, textareas, radio groups and check box groups (also see the note on dropdown list).
Textbox Example username:{ required: true }
Check box example: checkAgreeToTerms :{ required: true }
Radio Button Example: Color:{ required:true } See the demo @CodePen
minlength:
This validation rule is to check the length of the input. Textbox Example: username:{minlength:6} means at least 6 characters need to be input for username
Checkbox Example: minlength also can be used with checkbox group. subscriptions:{minlength:3} means at least 3 options should be selected from the subscriptions group.
Also note that you may want to add required validation to the same element. Minlength means that if the user attempted entering the value, then check minlength. So if there is no input, minlength has no effect.
maxlength:
Check the maximum length of the input.
textbox or textarea: message:{ maxlength:100 } means the validation will not allow more than 100 characters in the message field.
checkbox group: subscriptions:{maxlength:3} means maximum of 3 options can be selected.
rangelength:
A combination of maxlength and minlength together in a single validation. textbox or textarea: message: { rangelength:[6,100] } The length of the textarea message should be minimum 6 characters and maximum 100 characters checkbox group: components:{ rangelength:[2,5] } For a checkbox group named components, at least 2 should be checked and maximum 5 can be selected See the demo @CodePen
min:
For numeric inputs, the minimum value required. Example: age:{min:13} If age is less than 13, this validation will throw an error. Note that you may want to add ‘required’ validation separately. If no value is entered, the min validation is not triggered. See the demo @CodePen
max:
For numeric inputs, the maximum value allowed Example: distance:{max:60} If distance is more than 60, this validation will throw an error.
range:
Check whther the value is between certain numeric range age:{range:[21,31]} Check whether age is between 21 and 31
equalTo:
make sure one input is same as other. This can be used in fields like “confirm email” or “confirm password”. confirm_email:{equalTo:"#email"} The parameter is the jQuery selector for the other field. In this case, email is the ID of the other field. See the demo @CodePen
remote:
Validate something by communicating with the server. For example, check whether the username is already in use. In that case, we need to check the value in the server’s database. “remote” gives a convenient option . It sends the value through Ajax to the server side script and let it validate. For more info, checkout the example.
Example: remote:'http://server.com/validators/check-username.php'
Format Validation Rules
This set of validations are to check whether the input follows a certain format.
email:
Example: user_email:{email:true}
url:
Example: website:{url:true}
number:
Checks whether a valid decimal number is entered Example: weight:{number:true} This will accept numbers like: 11.23 42 53.0001 See the demo @CodePen
digits:
Allow only digits in the field. No decimal point or comma is allowed. See a demo @CodePen
creditcard:
Checks the input for a valid credit card format.
Additional Methods
There are additional validation methods in the additional-methods.js. Include additional-methods.js, if you need these additional validations.
<script type="text/javascript" src="http://ajax.aspnetcdn.com/ajax/jquery.validate/1.11.1/additional-methods.js"></script>
accept:
This validation is for file uploads. The parameter to this validation is the list of mime types accepted. More than one parameter can be given separated with comma. Examples: pdffile:{ accept:"application/pdf" } photo:{ accept:"image/*" } See the demo @CodePen
Here is the full list of mime types.
extension:
This validation is also for file uploads. Check the file extension of the selected file. Separate more than one extensions with a | Example: docfile:{ extension:"pdf|doc|txt" }
skip_or_fill_minimum:
This validation is for a group of input fields. Either fill in the fields or skip the group all together. “Either at least X inputs must be filled, OR they must all be skipped (left blank).” The parameter is the jQuery selector for the group. You can add a common class for the members of the group and use that as a selector. See the example: partnumber:{skip_or_fill_minimum: [2,".productinfo"]} means, at least two items from the group productinfo needs to be filled.
require_from_group:
This validation is also for group of fields. At least n number of fields should be filled from the group. The parameter is the jQuery selector for the group. You can add a common class for the members of the group and use that as a selector. Example: partnumber: { require_from_group:[2,".productinfo"] } See the demo @CodePen
Select one contact info: email: { require_from_group:[1,".contact"] } See the demo @CodePen
maxWords, minWords, rangeWords
Check for number of words in the input. Examples: article:{ maxWords:1000 } review:{minWords:100} description:{rangeWords:[100, 500]}
pattern:
Validates with a regular expression pattern passed as the parameter. Example:
$('#myform').validate(
  {
    rules:
    {
      code:
      {
        required:true,
        pattern:/^AR\d{4}$/
      }
    },
    messages:
    {
      code:
      {
        pattern:"The code should be like this: AR1234"
      }
    }
  });
alphanumeric:
Alphabetic, numeric or underscore ( _ )only allowed in the input
integer:
A positive or negative integer - without decimal point
lettersonly:
Allows only a to z and A to Z in the input. No Spaces.
letterswithbasicpunc:
Allows letters and punctuation like hyphen(-), comma(,), period(.), brackets() and single quotes(’’)
nowhitespace:
Allows no whitespace in the input
dateITA:
Validates dates in the format: dd/mm/yyyy
time:
Validates time in this format hh:mm This is in 24 hour format Examples: 10:30 12:15 1:30
time12h:
Time in 12 hour format. For example, 1:30 pm 2:00 am
url2:
Validates a URL; However, TLD (Top Level Domain - .com .net etc) is optional. for example, http://localhost/home.html is valid
ipv4:
Validates IP v4 address like this: 192.168.1.11
ipv6:
Validates IP address (IPV6) like this: 2607:f0d0:1002:51::4
bankaccountNL:
Dutch bank account numbers (not ‘giro’ numbers) - 9 digits acceptable: 123456789 or 12 34 56 789
bankorgiroaccountNL:
Dutch bank or giro account number
mobileNL:
Dutch Mobile numbers
phoneNL:
Validates Dutch phone numbers Dutch phone numbers have 10 digits (or 11 and start with +31).
giroaccountNL:
Dutch giro account numbers (not bank numbers) have max 7 digits
postalcodeNL:
Validates Dutch postal codes
mobileUK:
Validates UK mobile numbers. More info of UK mobile formats: Regular expressions for validating British telephone numbers
phoneUK:
Validates UK Phone numbers
phonesUK:
Matches UK landline + mobile, accepting only 01-3 for landline or 07 for mobile to exclude many premium numbers
postcodeUK:
Matches UK postcode. Does not match to UK Channel Islands that have their own postcodes (non standard UK)
cifES:
CIF is the tax identification code for Spanish legal entities
nieES:
validates NIE code that is used to identify the non-nationals in Spain
nifES:
The Número de Identificación Fiscal ( NIF ) is the way tax identification used in Spain for individuals
phoneUS:
Validates with the US phone number format The area code may not start with 1 and the prefix may not start with 1 allows ‘-’ or ’ ’ as a separator and allows parens around area code some people may want to put a ‘1’ in front of their number Some Valid US format phone numbers: 1(212)-999-2345 or 212 999 2344 or 212-999-0983
vinUS:
Checks if the value is a valid vehicle identification number (VIN).
zipcodeUS:
Validates ZIP code in USA
bic:
BIC is the business identifier code (ISO 9362)
iban:
Validates international bank account number. It has a country - specific format
See Also
- How to Use the Dreamweaver Form Validation Feature
- JavaScript Form Validation : quick and easy!
- JavaScript Form Validation Script: More features
- Simfatic Forms Validation: save your time coding
- JavaScript Form Validation - Confirm Password
- JavaScript Form Validation - Date
- JavaScript Form Validation - Phone Numbers
- JavaScript zip code validation
- Javascript code to validate email addresses
- Javascript password validation alphanumeric string